

Welcome to "The Gods Are Bored," quick-blogging while the spaghetti sauce simmers! I'm Anne Johnson, your hostess, and sadly I have no pie tonight. Try me on Sunday.
All too often, when we think of Faerie, we think only of human-like creatures. In fact, Faerie is chock a block with non-human beings. Think of your local wildlife refuge, then transfer it across the veil. Yep, magical creatures. Scads of them.
When I was young, I had the companionship of a furry creature I called "Ewt." He had a long face like a deer, and pointed ears, but they were high on his head like a cat's ears. He was furry and could change sizes at whim.
Not only did I have Ewt, but he was one of a big flock of ewts. There were many ewts. Mine just liked me. The rest were his friends.
I had an uncle who was a doctor. When he first began practicing medicine, my dad and I visited his office. He had a little figurine on his desk. I identified it immediately as my ewt. Uncle, always obliging ( to his dying day, alas! Oh, I loved him!) gave me the ewt statue.
But this was just a statue, a representation of the Ewt I knew from the Other Side. I played with Ewt all the time, and I talked to him too.
Many, many years later I purchased a book called The Notebooks of Brian Froud. Brian draws Faerie. Not just Gothic steampunk fairies like Amy Brown. Brian draws Faerie. And in that book I found a perfect rendition of Ewt.
I can't say I was surprised. If anyone else was going to see ewts, it was Brian Froud. I was just amazed that he got so many of the details spot-on. It was a pleasant confirmation that I wasn't alone in enjoying such a fabulous magical creature.
A few years ago, I met Brian Froud. I had him sign my copy of Notebooks right next to the ewt drawing. I asked him where he had seen this creature, and he said the woods. I told him that this was not a unique creature, but a whole species of creature that had many, many individuals. He had never seen a herd of ewts and was intrigued by the possibility.
Beyond the veil are creatures. Not just humanoids with pointy ears. There are creatures with fur, feathers, and wings. Reptilian beasts and little furry gerbil-like cuties.
Why should life beyond the veil be any leaner than the apparent world?
But don't wait to cross the veil before you embrace the creatures of Faerie. Look and listen for them just before you dream. Encourage your children to play with them -- kids see them. I should know.
Embrace the ewt in your back yard. Ewts do not eat your garden.
Hello there!
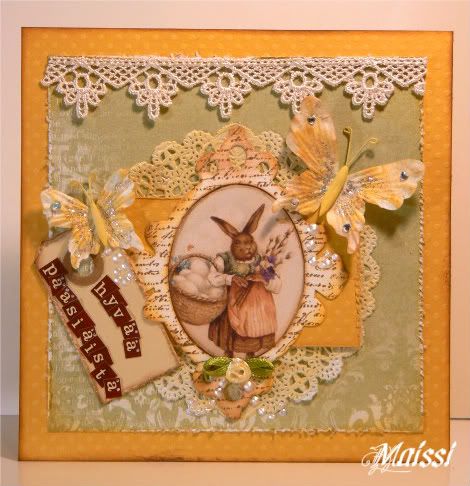
We have a new month, the great month of April, which I consider to be the first real spring month! At least in Sweden it´s a month of really unreliable weather, April jokes and big fires with men´s choirs that sing to welcome spring. I´m not sure about the April traditions of our neighbor countries but I know for sure that April this year also is the month of EASTER!
And since it´s my ( Eva´s) turn to give you a challenge this month, and since I LOVE Easter, my challenge for you is to make
An EASTER CARD in TWO COLORS of which one has to be YELLOW and the other is of your own choice. SMALL amounts of other colors will be accepted , but the two main colors have to dominate.
We actually have two prizes this month, for two lucky winners....
and the prize is sponsored by lovely
who can resist that ?!

Prize no1:
2 rubber stamp sheets


Prize no2:
2 rubber stamp sheets and one single text rubber stamp.


All of the rubber stamps are from Stempelglede's latest collection,
they are in solid red rubber stamp, in high quality,
and they are gorgeous, may we add!!!
If you want to see more details about the stamps
take a look here.
Here are some words from our generous sponsor:
Stempelglede present a unique line of rubber stamps designed by the Norwegian artist Gunhild Bay. High quality rubber stamps for scrapbooking and card making. The stamps are currently available in Norway, Sweden, Denmark, Finland and Germany, and several of the retail stores carrying the Stempelglede line of stamps do ship internationally.
****
Here is some inspiration from the Design Team:
Marianne

Lene


Rikke

Rikke

SasSa


Eva


Maissi
Donna


To enter the challenge, please leave your name and a link to your card in the Mr Linky scheme below.
Deadline is the 8th of April, midnight StampArtic time.
GOOD LUCK!
Welcome to "The Gods Are Bored," where things get curiouser and curiouser. Is life that way for you? I guess if I live long enough never to be surprised by people, I should just part the veil and step on through.
Thank you to all who have offered the aid of your dragons to the cause of the Mountain Tribe! I would only ask that you not send any dragon who has deep sentimental value for you, as we will be tossing them about a bit, and they might get torn or dusty or (OH PLEASE NO) muddy! If your dragon still wants to come to the Fairie Festival at Spoutwood, my email is luvbuzzards at yahoo dot com.
And now, a personal message, so skip this if you aren't PAM OR RITA! YES, PAM AND RITA, I NEED FABULOUS STUFF FOR THE MOUNTAIN TRIBE! We have an official banner, but a beautiful Mountain Tribe tapestry that can stand alone would be fabulous to have in the brand-new Tribe tent -- where there's no competition, oh no, but two of the four tribe leaders are ARTISTS. Contact me as above, and we can brainstorm! Do you want a challenge? Make me a 3-D tabletop mountain!
On to today's sermon. Tired old topic, I know, but this is what's on my mind as Mercury goes into a nasty Aries retrograde.
In the past year, my sister has adopted two dogs and five cats. She has gotten a tattoo. She and her husband paid to have their basement finished, pretty much just to give the cats somewhere nice to live. Now they are planning to travel to China to adopt a child.
Last week, my sister's wonderful, adorable Amazon parrot flew into a wall and died. Sis grieved for about 48 hours before her husband presented her with a new Eclectus parrot. Sis had had her Amazon for almost 25 years, but never mind, now she has a new parrot. "It is helping with the grieving process," she said.
Today I got an email from Sis. I'm sick over what she had to say, but not because of the money involved or any of that. It's just another red flag rising amongst a sea of red flags -- think of a bathing beach 1,000 miles long with a gale warning along the entire length of it. I'm talking that kind of red flag alert.
Must have been four years ago, Sis gave me some pierced earrings that she had gotten from her mother-in-law's estate. Two of the pairs were pretty valuable.
I'm not much of a wearer of fancy jewelry, and I'm pretty cavalier with gold and gems. It's all rock to me. (Well, except for my wedding ring.) So when the good folks battling development at Terrapin Run were seeking items for a silent auction (to help pay the land use lawyer), I donated the earrings to the cause. And they fetched a nice sum too.
In her email this afternoon, Sis asked if she could borrow one of those pairs of earrings. It seems that she has gotten her ears pierced. She is five years younger than I am, and she has worn clip earrings her whole life.
Whatever possessed her to get her ears pierced, she wanted the gift earrings back. Which of course can't happen, because the baubles in question saved a little stream.
The bigger alarm flag rose when she wrote that she could not afford a pair of 14-carat gold earrings right now.
With all the expenditures she and her husband have made in the past year (vet bills alone must be high four figures), what moved her to get her ears pierced in the first place? What is moving her to do all the things she's doing? I've told her I'm scared for her. I've told her to take the slow track on adopting, to outsource a few of the cats. I sent her a sympathy card for her bird, figuring there was no replacing that special parrot... It could not have arrived before the new bird was bought.
What's wrong with my sister? I'm so worried! I'm sure she'll provide a better home for a disabled Chinese boy than some orphanage, but it's not the child that gives me pause, it's her.
At this point I'm keeping things civil, because a while back I confronted her and was told that Druids must be bad people if they were so judgmental. I can't help but feel, though, that I'm watching construction of a house of cards. A pair of earrings is nothing compared to the magnitude of impulsive decision-making I'm seeing.
Oh snap. Thanks for listening. If you look at how the bored gods get along with their siblings, it's often similar stuff. Please light a calming candle for this sis of mine. Fire can only rage for so long before it consumes its fuel.
|

Welcome to "The Gods Are Bored!" Today's sermon is on a fabulous beast from beyond the veil: the dragon.

I believe in dragons. We have their bones all around us and are still digging more up. We put those bones together and call them dinosaurs, but what they really are is dragons.
Dragons live in the Other World now, but still we can feel their intentions, both dangerous and benign. Only a stone cold fool would court a dangerous dragon, but you see people who do it -- big old tattoos on their arms, t-shirts that breathe fire. Don't come crying to me, tough guy, when that dragon thrashes you into a puddle of karma.
As for me, I prefer benign or beneficial dragons. A benign dragon just wants to play fetch, climb trees, and laugh as you beg it to come down. Beneficial dragons, though not seeming to be fierce, can protect you when the world is coming to pieces around you.
Big Red is a benign dragon. As you can see, he climbed a tree and laughed when I begged him to come down. I laughed too. Laughter is a good thing.

All of this is prelude to the most bizarre but necessary "Gods Are Bored" shameless plea ever.
I need stuffed dragons. At least a dozen. If you have a stuffed dragon, or you know where to get one cheap, I will pay its postage from you to me, and back from me to you.
When I said that the Mountain Tribe would sponsor a dragon toss at the Spoutwood Farm Fairie Festival, I thought it would be nothing to pick up a dozen dragons from the thrift store. Over the years I have seen dragons there aplenty. I got Big Red there. Since then I've passed over quite a few cute dragons simply because I had no need for them, and I figured there were kids out there who needed benign dragons.
In the past four weeks, I have rescued exactly one dragon from the thrift store. There's a distinct dragon deficit.
So if you have a dragon, or you know where you can get one cheap, or you see one between now and mid-April, help me out here! I'll pay you to send me your dragon. I'll keep scrupulous records of which dragon belongs to which person. And then, after your dragon has gotten a chance to soar and fly for a weekend, I'll send it back to you. It will be extremely contented and bring you scads of good luck and happiness.
Talk to Miss Annie. I need to borrow your dragon.
PS - In this post I have called dragons "it" because dragons come in both genders, and I didn't want to say he/she.

I believe in dragons. We have their bones all around us and are still digging more up. We put those bones together and call them dinosaurs, but what they really are is dragons.
Dragons live in the Other World now, but still we can feel their intentions, both dangerous and benign. Only a stone cold fool would court a dangerous dragon, but you see people who do it -- big old tattoos on their arms, t-shirts that breathe fire. Don't come crying to me, tough guy, when that dragon thrashes you into a puddle of karma.
As for me, I prefer benign or beneficial dragons. A benign dragon just wants to play fetch, climb trees, and laugh as you beg it to come down. Beneficial dragons, though not seeming to be fierce, can protect you when the world is coming to pieces around you.
Big Red is a benign dragon. As you can see, he climbed a tree and laughed when I begged him to come down. I laughed too. Laughter is a good thing.
All of this is prelude to the most bizarre but necessary "Gods Are Bored" shameless plea ever.
I need stuffed dragons. At least a dozen. If you have a stuffed dragon, or you know where to get one cheap, I will pay its postage from you to me, and back from me to you.
When I said that the Mountain Tribe would sponsor a dragon toss at the Spoutwood Farm Fairie Festival, I thought it would be nothing to pick up a dozen dragons from the thrift store. Over the years I have seen dragons there aplenty. I got Big Red there. Since then I've passed over quite a few cute dragons simply because I had no need for them, and I figured there were kids out there who needed benign dragons.
In the past four weeks, I have rescued exactly one dragon from the thrift store. There's a distinct dragon deficit.
So if you have a dragon, or you know where you can get one cheap, or you see one between now and mid-April, help me out here! I'll pay you to send me your dragon. I'll keep scrupulous records of which dragon belongs to which person. And then, after your dragon has gotten a chance to soar and fly for a weekend, I'll send it back to you. It will be extremely contented and bring you scads of good luck and happiness.
Talk to Miss Annie. I need to borrow your dragon.
PS - In this post I have called dragons "it" because dragons come in both genders, and I didn't want to say he/she.
|
I like to make homemade flowers and sat one day trying
to make different flowers with the Retro punches from EK Success.
And I came up with some flowers and a rose I like very much.
Made some more roses and used on some of my projects.
For ex, if you remember
on my chest in the new years resolutions earlier this year.

Jorunn in the StampARTic team asked me where I had bought the flowers.
I told her I made it myself.
And that´s how this tutorial came to life.
Here´s how I make the rose.
Material used....
Retro punch from EK Success
(I use Large to a large flower and medium to a smaller one.)
(I use Large to a large flower and medium to a smaller one.)
But I think any five petal flower would work. Why not give it a go..?
Glue - I think Glossy Accents from Ranger works best.
Two shades of glimmer mist. I use a red and an orange one.
Heat tool (for embossing) but I use it to dry the flowers when I have misted them.
A pair of scissors.
And a pair thin pointy tweezers.
A sheet of good quality paper
I use one we put photos on for albums here in Sweden.
But I think water color paper works also.
Cardstock does not take the water so well, it bleeds
But one can always try.
Finally, one larger cardboard box to mist and dry the flowers in.

I punch out 4 flowers for every flower I´m are making.
So here´s 2 large and 2 small roses.

Put them in the cardboard box on some tissue paper.

Start mist with the darker color.

I mist one layer and then I dry them with the heat tool.
If there are larger spots of mist it does not matter I think it only looks more real.

Dry after one layer

Then I continue with more mist until I think it´s good color on the flowers.

Dry after 2 layer

3 and my final layer this time. Heat dry and turn the flowers.

Mist the other side with the lighter color.

Here dry after 2 layers.

See the differens?
Some are on the deep red side,
the others are on the orange side.
This is how I color them to look more like the real thing.

Begin with one flower and choose witch side to begin with.
I choose the orange side.
Put the tweezers on the middle of one petal.

Pull one side of the petal up and the other side down
and at the same time twist and press around the tweezers.

When I have done that all around the flower it looks like this.
I do this to give the flower more volume.

As I think the rose looks more real with different shades I choose
to use 2 on the deep red and 2 on the orange side.

Then I take the first flower and cut away the
middle, but so it still holds together.

Now it´s time for the tweezers again.
I press and twist the tweezers backwards.

This is how it looks on the other side.

Roll the first petal to make the center of the rose.

Put a drop of glue (in this case Glossy Accents) In the middle of the first petal.

Hold together until the glue are little dry.

The I put a drop of Glossy on the second petal.

Put the first rolled petal on the second.
Wrap it around the first petal.

A different angle.

Put glue in the middle of third petal and

Wrap around the rose bud.

Press and hold until a little dry.

Forth and fifth petal I make a little pointy.
Take the tweezers and press it from the middle of top to one of the edges.

Pull backwards.

Turn and do the same.
Press from the middle of the top to the other edge this time.

And turn it backwards.

Now the forth and fifth petal looks like this.
And I put glue on them. In the middle.

I put the glue in the middle because if I put it to fare up it will show
and if too fare down it will not hold together if I have to cut it shorter.

I continue to wrap the petals around the rose bud.

First layer done.

Little closer up.

Cut the second layer as the first and now I use the deeper red side up.

Make the petals pointy. All around.

Now I dare to glue more than one petal at a time.

Wrap and press lightly.

Hold it until it feels a little dry.

Wrap...

.... and wrap

... and press lightly.

Second layer done. Hold it until it feels a little dry.


Now to the last two layers.
Make the petals pointy like you did with the second layer.

First I MIGHT have to cut the bud if it is too long.
I try position the rose bud in the 3 layer and if the bud sticks up
to fare above the third layer petals then I need to cut it.
That´s why the glue is so important in first and second layer.
Cause if I have not glue properly
and I cut it I take away the thing that holds the petals together
and it will fall apart.
ALSO I´m very careful when I cut so the bud
does not fall apart if the glue still are wet OR so i does not go all flat.
Then I adjust it before I continue.

A big blob of glue in the center of the 3 layer.
Orange side up.

Sometimes I even take some glue on the petals but then
I put it fare down towards the center so it does not show.
I also try to put the flowers so the petals
are shown in between, like every other.

Again glue in the center. Last layer now... Deep red side up.

Here I have turned the flower so the petals are shown in between every other.
Deep red, orange, deep red, orange, deep red......

Finished rose.

And here´s all four roses that I begun with.
2 large ones and 2 small ones.

A small box with some newly made roses.


Some more earlier examples already shown...
Here I only show the lighter shade side.
But if I look from the side I see the darker too.


A red and orange one.

I hope you like it.
If you redo the tutorial please link back to this.
Good luck!!
Hugs SasSa

