

A new tutorial from ARTsy-team, and this time we will show you how to do the gesso resist technique. This technique is easy and simple, and takes approx. 10 minutes to make. You can make the most awesome backgrounds in different colors and stamps...
Dette er et forslag på hvilke produkter du kan bruke til denne teknikken...
This is a suggestion of products to use for this technique...
 Du kan bruke følgende / You can use the following products together...
1. Gesso or Adirondack dabber + mini misters with distress reinkers
2. Gesso or Adirondack dabber + mini misters with distress reinkers & brayer
3. Gesso or Adirondack dabber + blending tool & distress inks
4. Gesso or Adirondack dabber + distress inks & brayer
Step one...


 Begynn med å påføre et tynt lag med gesso på non-stick matte, og trykk stempelet nedi gessoen et par ganger. Stemple på ønsket kartong, der du ønsker trykket. Du kan selvfølgelig gjenta dette flere ganger ettersom hvor mange resist-trykk du ønsker.
NB! Du må vaske stemplet rett etter siste trykk, og da gjerne med en sprayflaske med vann og en våt klut.
Start by appliing gesso on a non-stick matt in a thin layer, and press the stamps a couple of times into the gesso. Use the stamp on your background paper, and continue until you have the wanted result.
NB! Remember to wash your stamp right after use, as the gesso dries fast. Use a spraybottle of water and a wet cloth.
Step two...
 For å farge bakgrunnen min, så har jeg valgt å bruke mini misters med distress reinkers og brayer.
To color my background, I have used mini misters with distress reinkers and brayer.


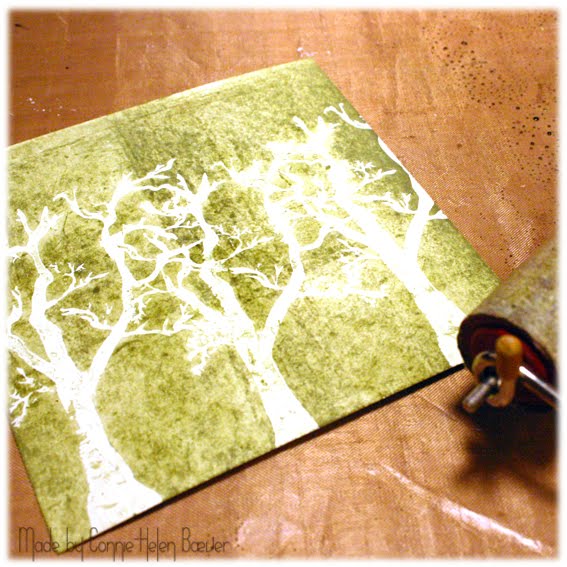 Bland et par farger på non-stick matta di, og her har jeg brukt fargene "peeled paint" og "old paper". Bruk brayeren din med farge til hele bakgrunnen din er dekt som vist over.
Mix a couple of colors on your non-stick matt, and here I have used "peeled paint" and "old papier". Use your brayer with the color until you have covered all of your background paper as shown above.
 Et tips - sprut litt vann på tørkepapir og sveip over gesso-trykket. Da vil distressen bli overført på tørkepapiret, og trykket blir hvitere.
A tip - use some water on a towel and go over the gesso. This way the distress ink will be transfered to the towel, and the gesso-print will be more white.
 Her ser du hvordan bakgrunnen ser ut med gesso-resisit, distress blekk og blendig-tool.
Here's the background with gesso resist, distress ink and blending-tool.
 Her er samme bakgrunnsteknikk brukt, men med mini misters i stedet for brayer og blendig-tool. Varm gjerne med varmepistol for å få bakgrunnen din raskere tørr.
Here's the same technique, but with mini misters instead of brayer and blending-tool. By using the heatgun, your background will dry faster.
Inger's card...

Connie's cards...

 Vi setter utrolig stor pris på kommentarer til vår teknikk, og legg gjerne igjen en link til ditt "gesso resist"-kort :-)
We appriciate comments for our technique, and be happy to leave us a link to your gesso resist card :-)


0 Response to 'Tutorial - Gesso Resist'
Post a Comment