Tutorial: Walletcard

Posted by Princess Eva Angelica On 9:16 AM 0 comments
Tutorial: Walletcard


Idag ska jag visa hur man gör ett plånbokskort.
Designen på kortet är superlätt att variera.
Jag har valt att idag visa några idéer på hur man skulle kunna dekorera sitt plånbokskort.

Today I will show you how to make a walletcard.
The design of the card is supereasy to vary.
I have decide that today I will show you some ideas of how to decorate your walletcard.

*


Här har vi lite utav det material som kan behövas. Givetvis kan man behöva lite fler saker, exempelvis; lim, en cuttlebug (el Epix Six) och lite annat smått och gott att smycka kortet med.
Papprena du använder underlättar om de är i storleken: 15 x 30,5cm
(skär helt enkelt itu 30,5 x 30,5cm papper till halva storleken)
Kolla bredden på embossingplattan. Är den 14cm så blir plånboken längd 14cm.
Är embossingplattan endast 13cm så måste även plånboken ha den längden.
Cuttlebug har en embossingplatta som ser ut som skinn. Fiskars har också en variant som heter ”Lether” (det är den som jag har använt på mitt kortet) På bilden här ovan kan ni se båda embossingplattorna.

Here is some of the material that we need.
You may need some other things to.
For example; glue, a cuttlebug (or a Epix Six) and other stuff that you can decorate the card with.

The papers you use helps if they are in size: 15 x 30.5 cm
(Cut the 30.5 x 30.5cm papers to the half size)

Check the width of the embossingplate, is it 14cm? Then the wallets length will became 14cm also.
Is the embossingplate only 13cm then the wallet also get that length.
Cuttlebug have a embossingplate that looks like leather. Fiskars have also a variant called "Lether" (that's the one I've used) In the picture above you can see both embossingplates.


Min underbart "fina" skiss på kortets vikning ;P

My "beautiful" sketch at the cardfolding ;P


Nu bigar du plånbokens stomme. Gör som min skiss visar.
Skär bort de resterande 5,5 cm.

Now you fold the cardstock. Do as my sketch shows.
Cut and remove the remaining 5.5 cm.


Här har jag skurit till de resterande papprena som ska smycka plånboken.
Det mörkbruna pappret är egentligen mest till för att kortet ska få stadga och att den ska få en snyggare look.
Det ljusa pappret ska få agera skinnimitation.
Jag har mätt papprena efter plånbokens tre utsidor.
Det är en smaksak hur man vill ha framsidans alla sidor, därför sätter jag inga direktiv för vilka storlekar dom ska ha.
Remmarna kan däremot vara ca 14cm långa och 2cm breda.

Here I have cut the remaining papers to decorate the walletcard with.
The dark-brown paper is just for give the wallet a nicer look and also a better stability.
The brighter paper is going to act the imitation-leather.
I have measured the size of the paperspieces, with the three outsides of the wallet.
It is a matter of taste, how you want the front pages, there for I will not put any directives for which sizes there can have.
The straps may however be about 14cm long and 2cm wide.

Här har jag fixat till kanterna med en superbra ”mätsticka” från Mirabyll.
Jag har ritat efter cirkeln längs papprets kant och därefter klippt ut med sax.
(Givetvis kan man använda olika hörnstansar istället, det underlättar ju arbetet) :)
Till plånbokens ”lock” har jag använt cirkeln på 2,25 cm.
Till remmarna har jag använt cirkeln på 1,5 cm.
(Plånbokens lock kan man smycka på många andra sätt också. Tex med en kantstans längs hela långsidan eller varför inte stansa hörnen med en fin hörnstans? Eller låt arket vara rakt och limma fast en spets längs med långsidan.)

Here, I've fixed the edges with a great template from Mirabyll.
I've drawn the circle along the edge of the paper and then cut out with a scissor.
(Of course you can use corner punches instead, it facilitates the work of course) :)
I have used the circle of 2.25 cm to the wallets "lid".
To the straps, I have used the circle of 1.5 cm.
(The Wallets lid can decorates in many other ways. For example with an edgepunch or why not punch the corners with a nice cornerpunch?
Or glue a beautiful lace along the side.)

Dags att embossa ”skinnbitarna”.
Glöm inte att embossa de två remmarna också.
Embossa endast de papprena som ska agera skinnimitation.
(alltså inte de mörkbruna papprena i mitt fall)

Time to emboss “the lether pieces".
Do not forget to emboss the two straps!
Embossing only those paperspieces that will act imitation-leather.
(In my case, not the dark-brown paperpieces )

Här har jag använt mig av en stansverktyg från Fiskars.
Fyrkanterna ska jag använda som spännen till remmarna.

Here I have used a punch from Fiskars .
These squares I going to use like buckels for the straps.

På baksidan har jag ritat upp stödlinjer för att slutligen skära ut hålen med en skalpell.
Även här finns det många idéer om hur spännena kan se ut. 

On the back, I have drawn up guides to finally cut out the holes with a scalpel.
Even here there are many ideas on how the buckels can look like.

Här har jag limmat fast bitarna på plånbokens stomme(cardstocken)
Som ni ser har jag även sytt med symaskin längs skinnimitationens sidor,
vilket får plånboken att se mer äkta och snyggare ut.

Here I have glued the pieces at the walletcardbase (cardstock)
As you can see, I have also sewn with sewing machine along the letherpieces,
It´s looks more real and get´s a nicer design.

Gör hål och sätt gärna öljetter i remmarna så blir även dem mer naturtrogna.

Make some hole and put eyelets in them.


Sätt fast 3D-kuddar på baksidan av spännena.
Men se till att inte fästa några 3D-kuddar på ovan och underdelen!
(där jag ritat pilar)

Put 3D-pillows at the back of the buckles.
But do not put any 3D-pillows at the upper and lower parts!
(look at my arrows in the picture)

Här har jag satt fast spännena på plånbokens lock med hjälp av 3D-kuddarna.
Och därefter fäst remmarna i spännena.
Nu måste du limma fast remmarna på baksidan av plånboken.

Here I have attached the buckles at the wallets lid with help from the 3D-pillows.
And then attached the strapes in the buckles.
Now you have to glue the straps on the back of the wallet.

Här har jag limmat fast remmarna. Men för syns skull så har jag satt dit
lite mönstrat papper ovanpå kanterna.

Here I have glued the straps. But for show, I have put some
piece of patterned paper over the edges.

Nu tar du och skär ut två stycken identiska pappersbitar i storleken 10 x 8cm.
Jag valde samma färg på pappret som plånbokens stomme.
Därefter bigar du papprena längs långsidan 10ggr. Alltså 1cm x 10ggr över hela pappersbiten.
Slutligen viker du dem så de ser ut som två dragspel.

Now you cut out two identical pieces of paper in size 10 x 8 cm.
I chose the same color of the paper that the base(cardstock) of the walletcard.
Then you fold the papers along the longside 10 times. (1cm x 10 times)
Finally, you fold them so they look like two accordions.

Här har vi plånbokskortet, invändigt. Jag har ”fodrat” plånboken med ett fint mönstrat papper.
Även dekorerat plånbokens lock invändigt.
Här kan man exempelvis göra små fickor för personliga meddelanden.
Ungefär som visitkortshållare i en riktig plånbok.

Here we have the inside of the walletcard. The lining in the wallet are made of a beautiful patterned paper.
The inside of the lid have I decorated.
Here you can make small pockets for personal messages.
Like creditcards- or visitingcardsholders as it is in real wallet
s.

Slutligen limmade jag båda ytterkanterna på "dragspelsbitarna" för att sedan
fästa dem invändigt i plånboken, så det bildas ett myntfack.

Finally, I glued the two utter edges of the "accordionpieces" and then
attach them inside the wallet, so it forms a coin tray.
Färdiga resultatet!

Finished result!


(Ignorera gärna den vita färgen på mina fula, skrumpna fingrar..) ;)
Jag har avslutningsvis fäst locket med kardborre.
Det går annars att fästa locket med tex magneter, knappar, snören eller något annat,
det är bara fantasin som sätter gränser.

(Please ignore the white color at my ugly, shriveled fingers ..) ;)
I have finally attached the lid with Velcro.
It is possible to fasten the lid with other stuff, for example; magnets, buttons, strings or something else, it is just imagination who sets the limits.

*

Det skulle vara roligt att få se era plånbokskort ni fått inspiration av att göra
efter min tutorial.
Så maila gärna in era kort till oss på; stampartic@gmail.com
Så publicerar vi dem här på bloggen!

Kram Petra~Paradise

It would be lovelly to see your walletcards you got inspired to make
after my tutorial.
So please email us your cards to; stampartic@gmail.com
We will publish them here on the blog!

Hugs Petra~Paradise


| edit post

Winner - Template challange

Posted by Princess Eva Angelica On 11:31 PM 0 comments
Tusind tak for alle de fantastiske kort i har lavet til vores udfordring med skabelon.
Det er blevet tid at finde en vinder.

***

Thank you for all the great cards you made by using our template.
Its now time to announce a winner

*


*


*


*


*


*


Tillykke !! - Congratulation !!

Send din adresse til Stampartic@gmail.com
og du vil modtage din flotte præmie med posten

***

Send us your address to Stampartic@gmail.com
and you will recieve your beautiful gift in the mail.


Restoring Insanity March

Posted by Princess Eva Angelica On 5:38 PM 0 comments
Welcome to "The Gods Are Bored," twelve miles out from Kettle Point, bound for Boston, with ... nothing in particular.

(Every now and then I have to borrow from another author for my opener. I run out of ideas.)

A trickle of news tells us that Jon Stewart is proposing a "Restoring Sanity" march in Washington, DC on October 30. Apparently the target participant for this thing is someone who is sane and reasonable. Someone who doesn't hold strong views on either side of the partisan divide.

Putting aside the fact that I'm not sane enough to gain admittance to this march, I'm not sure I would go anyway. Talk about a boring event! This promises to be a major snooze-fest. A march by Middle Americans who don't feel strongly either way on the issues facing our country? zzzzzZZZZZZzzzzzzz!

How about a "Restoring Insanity" march? We could wave Flying Spaghetti Monster banners, drink Red Bull, speak Klingon, and throw red Fizzies into the Reflecting Pool. Then we could play paintball in the Lincoln Memorial before settling down to a Residents concert, followed by a midnight showing of "Harold and Maude."

Now that's an event I could see myself at!

Seriously. The only people who go to marches are people who feel strongly about something. Can you imagine getting up on the morning of the "Restoring Sanity" march and trying to decide what to wear? Navy Dockers and white button-down, or khaki Banana Republic crop pants with a basic J. Jill t-shirt? zzzzzzzzZZZZZZZZZzzzzzzzZZZZZZZZ!!!!!

None of that dull attire at my "Restoring Insanity" march! Come in your faerie wear, your best cosplay get-up, your favorite glistening yellow raincoat! And while we're at it, let's do some cosplay of our own. Travis Bickle re-enactors! Scary clowns! Reward for the best impersonator of Bob's Big Boy!

Boom boom, ain't it great to be crazy?

The moral of this story is simple enough. Sane people don't go to Washington to demonstrate their sanity. They stay home and mow the lawn.

While they're doing that, I say let's march, crazy lunatic people! Remember, our nation's motto is, "Out of many, one." There are plenty of crazies out there, and it's America -- they have to keep us. Let's show our gratitude by reminding America that we're nuts, and we vote in nutty ways, and democracy is the lunatic's best friend!

Who's with me on this? I have to know how much Red Bull to bring.

Some challenge changes...

Posted by Princess Eva Angelica On 4:33 AM 0 comments

Etterhvert som vi blir eldre... StampARTic runder snart 2 år... 
så evaluerer vi vårt online magazine, og gjør endringer underveis..
Og denne gangen har vi sett litt på våre utfordringer. 

Vi registrerer at det stadig flere utfordringsblogger ser dagens lys, 
alle like spennende og morsomme,
og det finnes noe for enhver kortlagersmak der ute.
Bra er det, ingenting kan få fart på inspirasjonen som en god utfordring! 

Samtidig så registrerer vi også at antall deltagere går ned her hos oss. 
Vi er jo ikke en utfordringsblogg, vi prøver å dekke flere områder innenfor
kortlaging, og har hovedfokus på artikler og tutorials. 

Så etter en liten evaluering internt i staben, har vi bestemt oss for å 
kutt ned til 1 utfordring i månden. 
Vi liker jo tross alt utfordringer, pluss at vi har noen flotte premier som vi også ønsker å dele ut... 

Så vår faste utfordring vil alltid bli den 1. i hver måned.... 
og hvert DT medlem har ansvaret for hver sin måned.
Vi starter 1. oktober.
I tillegg kan det dukke opp andre utfordringer, men det blir ikke til en fast dato, 
men i forbindelse med en artikkel eller tutorial. 


Så hva gjør vi med den ledige datoen 15. i hver måned???
Jo den fyller vi opp med flere artikler/tutorials eller annet snadder.... 
... og apropos tutorials.... 
Petra er tilbake med en flott tutorial i morgen...  ;o)
Ha en fin dag!

As we grow older... StampARTic is turning 2 years old soon....
..we evaluate our online magazine and make changes as we go.
And this time we have evaluated our challenges.

We notice that more and more challenge blogs are born, 
all of them so great and fun,
there is a challenge blog for every taste out there...
and we like that... nothing boost our inspiration as much as a good challenge. 

At the same time we notice that it is getting less participants in our challenges,
and that is OK.
We are not a pure challenge blog, but we try to focus wider in the 
card making hobby, and have main focus on articles and tutorials. 

So after an internal evaluation we decided to make a cut in our challenges, 
and only have 1 challenge a month.
We are keeping one challenge because we actually like doing that... and that we have
some great prizes from our sponsors that we would love to give you. 

The challenge will be on the 1st in every month,
and each DT member get to host a month each. 
starting October 1st.

But there can also be more challenges during a month, but not 
on a regular date... but we may challenge you to try out a tutorial or an article. 

So what do we do with the 15th in each month???
We are going to fill it with more tutorials and articles! 
and speaking off.... 
Petra is back already tomorrow with a great tutorial for you... ;o)
Have a wonderful day!


Long Strange Trip

Posted by Princess Eva Angelica On 3:44 PM 0 comments
There's a store over in my sidebar called Woodstock Trading Company. Woodstock is a family-owned business, and its merchandise is teleported straight from 1972 to the present. They don't sell pipes at Woodstock, but everything else is hippie dippy trippy. All of my faerie balls have come from there, and most of my ritual candles and incense as well. If what you want is a Grateful Dead _________ (you fill in the blank, they've got it), you cannot do better than Woodstock.

On Sunday the folks at Woodstock had a Garlic Festival. They have it every year at the moment when they prepare their garden bed (in front of the store). They had a band on the lawn, Grateful Dead covers of course. They also had an old road trip hippie bus called the Sugar Magnolia.

Are you on the bus or off the bus?

Remember that old phrase? It's metaphorical, of course.

People who are on the bus are free spirits, adventurous, risk-takers. No two days are alike, because the bus is always rolling. Enjoy the ride!

Those who aren't on the bus play it safe, keep within routine, and ... well ... let's be honest. They prop up the people on the bus. If it weren't for the "off the bus" crowd, the people on the bus wouldn't have any gigs to play, no destination, no place to crash when they're sleeping off the shrooms. If we're perfectly candid, there wouldn't be a bus at all without the cooperation of people who aren't ever going to get on it.

So, what do the people who aren't on the bus get as a reward for supporting the people on the bus? The off-the-bussers get to live vicariously without incurring danger. They can lie on the grass and listen to the Grateful Dead, maybe get a little bit stoned, then rouse themselves and get back to work on Monday morning.

I'd like to be on the bus, but I'm not much of a risk-taker. It's too easy to sit in the grass, sing along, enjoy the sky, return home and cook dinner.

One of these days, though, I'm going to throw all caution to the wind. I'm going to climb on the bus, take a long, strange trip. I'll be the one singing for the crowd, living for the moment, raking in adventure like a gardener on harvest day. I'll deal with the hangovers and the crazy fellow-trippers, because it's better to fly than to be rooted to the ground.

Yep, I have definitely not ruled out the long, strange trip. In the meantime, I had Jimmy snap this photo of me as an inspiration. It is never too late to jump on the bus. Don't believe me? Will it change your mind if I tell you I used to spend every Sunday morning in a Methodist church, and now I go to Garlic Festivals instead?

Our bus for the long, strange trip is taking passengers now. And later. Any time. No seat belts. Don't forget your tie-dye shirt! If you don't have one, they've got hundreds at Woodstock Trading Company!

Peace, love, flower power.

| edit post

She Who Hath a Trade

Posted by Princess Eva Angelica On 5:04 PM 0 comments
In August of 2004, my dad fell and broke his hip. He had, by that time, an advanced case of Parkinson's Disease. Part of the reason he fell was because he was confused.

It happened that my sister and her husband had reservations for a vacation in the Rockies at that very moment. So I had to go home and clean out my dad's apartment, because it was the end of August and the assisted living place wanted to move someone new into Dad's space on September 1.

And so, in the course of seeing my beloved father on his deathbed, and clearing out his belongings, I hardly noticed the email informing me that my services as a writer for Gale Group would no longer be required. The email came the same week I was caring for Dad. I happened to stop by the public library to look up my messages, and that was what I got.

Lost my dad, lost my job. Couldn't get either one of them back. Miss them both, but not the "them" they had become in the end. The "them" in their prime. There's a difference.

Well, there was no replacing Dad. But my stomach gets empty every 24 hours, so I had to find a job.

At first I thought I could get more writing gigs, so I applied to be a substitute teacher. By an entire quirk of fate, I began teaching not at Snobville High (where I thought I'd go, since it's within walking distance), but at an old-fashioned Vo-Tech with classes half a day and "shops" the other half. After working for 20 years alone in a home office, I was suddenly surrounded by hundreds of young people from Camden, New Jersey.

I liked them.

Thus I began subbing at the Vo-Tech regularly, and when an English teacher went out on extended leave, they gave me her classes. Then the business teacher had a maternity leave. I, who hadn't worked in an office since 1986, was teaching "Office Basics!" After that, I taught World History for eight weeks.

Then I took a test, along with about 125 other people. I couldn't believe how simple the test was. I had two hours to finish it, and I was finished in an hour. I literally checked every answer. "I must be taking the wrong test," I thought. But when I looked across the room, many of the other people taking the test looked baffled.

Before the test score even arrived, I got a Certificate of Excellence from the test place. Then I got the score. I completely aced a 120-question multiple choice test.

Last year I became a full-time teacher at the Vo-Tech under a provisional certificate. I had to go to night (and weekend) school, and pay lots of money to various individuals and state entities, in order to get a piece of paper that would officially certify me to do what I was already doing. You see, my degree was in writing, not teaching. There's no state in the union that wouldn't see this as an easy way to grab some ducats.

In today's mail I found my New Jersey certificate to be a public school teacher.

Friends, I never thought I would be a teacher. And candidly, if someone had foreseen teaching in my future, I would never have predicted it would be in a school full of poor urban kids.

Most days I miss my old job. It's easy being your own boss if you're motivated by hunger. But just as often, I look around me at all the fresh faces, all of our nation's future nurses, and plumbers, and office workers, and I'm glad to be out in the world, doing some good. Just a little bit of good, and no harm.

The Vo-Tech building was designed by the same architect who designed Philadelphia's famous Museum of Art (the one with the Rocky steps). Above the Doric columns and the mini-Rocky steps at the Vo-Tech, there's a motto chiseled into the facade:

"HE WHO HATH A TRADE HATH AN ESTATE"

(When the Vo-Tech opened in 1926, it was all-male.)

Often when I go to work I ponder this motto. I was a tradeswoman of words ... and I built a hut. Now I'm a teacher, building a cabin. It's a long push for the estate, but you know what? I'm not hurting anyone, and I'm doing a little good. Let them say that of me, at least.

| edit post

Home made rosebuds

Posted by Princess Eva Angelica On 3:18 PM 0 comments
Vi kan vel aldri få nok av blomster, eller roseknopper???
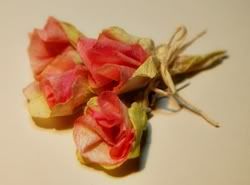
Jeg har lekt meg litt med kaffi filter, og laget roseknopper og blomster.
Kaffi filter er utrolig morro å leke med, det slites ikke, tåler vann og å bli krøllet og bøyd.
Og så finnes det nesten i alle hjem... så kanskje på ditt kjøkken finner du materiale til 
dekorasjoner til kortet ditt.

Do we ever get enough of flowers and rosebuds??
I don't think so!
I have been playing with coffee filters and made rosebuds and flowers.
Coffee filters are so much fun to play with, it can hold water without ripping, curled and bend, 
and still no rips. 
And... it is to be found in most homes... so maybe you have material for
embellishing your next card right there in your kitchen!

La oss starte - Let's get started:

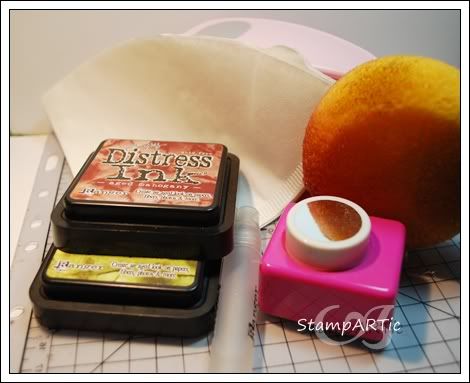
Dette trenger du:
Kaffi filter
puncher
distress ink
svamp
sprayflaske

This is what you need:
coffee filters
punches
distress ink
sponge
spray bottle

Step 1
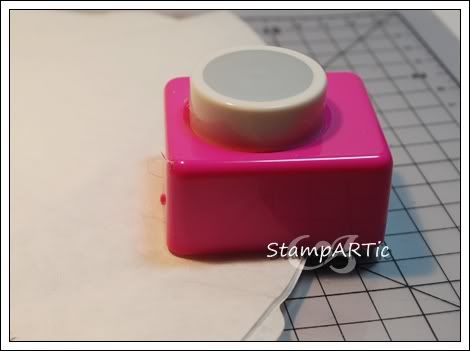
Start med kutte i kaffi filteret, jeg har brukt sirkel punch og en oval scallop punch.
Start with making die cuts in the coffee filter, using your punches.
I have used a small circle punch and a oval scallop punch.

Step 2:
Bruk svmapen til å dytte distress ink på sirklene.
Det trenger ikke være fint eller jevnt, bare dytt fargen på.
Jeg har brukt aged mahogany på de små runde sirklene og 
en grønn farge på oval scallop sirklene
Use the sponge to dab distress in on to the circles.
It doesn't have to be even or anything, just dab it on there. 
I have used aged mahogany on the small circles, 
and a green color on the oval scallop circles. 

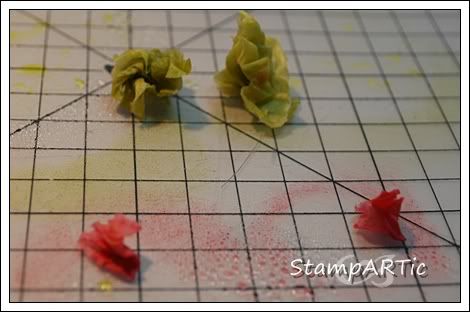
Step 3:
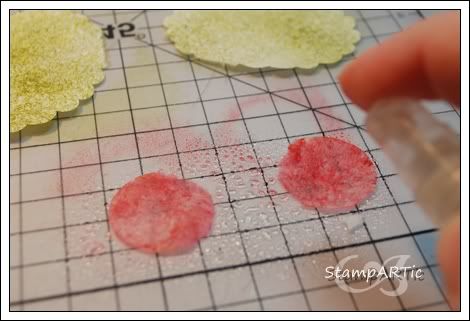
Spray vann på sirklene og
du vil nå se distress inken forandre seg og trekke seg jevnt utover hele flaten. 
 Spray water on the die cuts, 
and you will now see the distress ink changes and get all even.

Step 4:
Krøll sirklene sammen og la de tørke. 
Curl the die cuts together and let them dry.

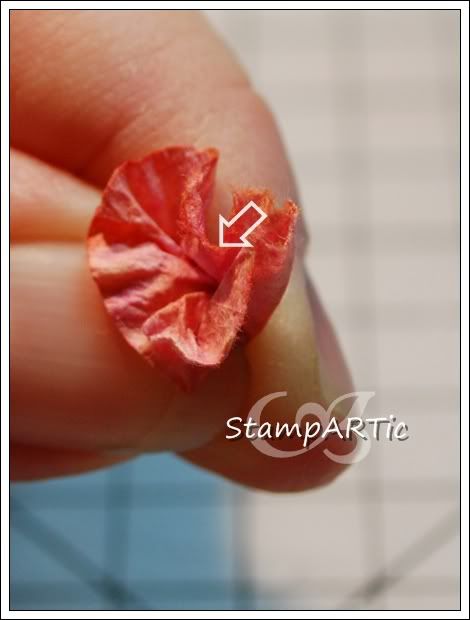
Step 5:
Åpne de røde små sirklene og krøll de sammen i bunn.
Ha lim flytende lim i midten av sirkelen (se pilen), og klem sammen.
Open the red die cuts, and curl them at the bottom.
add liquid glue in the center of the die cut, (the arrow), and squeeze.

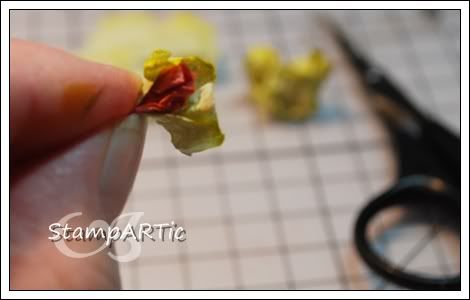
Step 6:
Jeg har brukt en saks å klipt opp de store ovale scallop sirklene, 
og bruker en liten del av de til å legge rundt den lille roseknoppen, som et blad.
I have used a pair of scissors and cut the large oval scallop die cut into smaller pieces, 
and I wrap it around the small rosebud, as leafs.


Step 7:
Bruk en grønn metall tråd, til å surre rundt roseknoppen, for å lage en stilk.
Jeg sparer på de grønne metall trådene som jeg klipper prima roser o.l, 
og så bruker jeg de til å mine hjemmelagde roseknopper. 
Og nå har du en fiks ferdig roseknopp klar til å gå på kortet ditt. 
Use a green metal wire and wrap it around the rosebud making a stem.
I save my left over metal wires, from prima roses and similar..
and I use them for my home made rosebuds. 
and now you have a rosebud all done, ready for your card. 


Enda en blomster - Another flower:

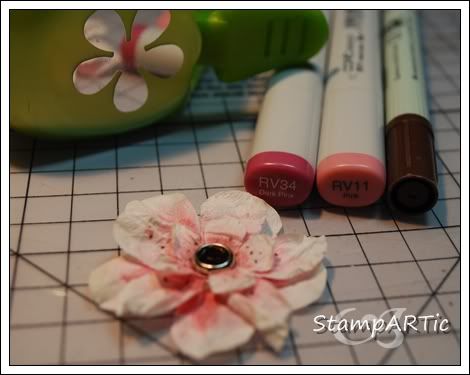
Her har jeg brukt Retro flower punches, i ulike størrelser på kaffi filteret.
Jeg brukte copic markers til å legge litt farge i senter, og en brun zig marker til å lage prikker.
deretter la jeg den lag på lag, og festet dem sammen med en brad.
Now I have used retro flower punches in different sizes to make die cuts 
in the coffee filters.
I have colored in the center using copic markers and a brown zig marker to make dots. 
I placed them on top of each other and I used a brad in the center to hold them together.

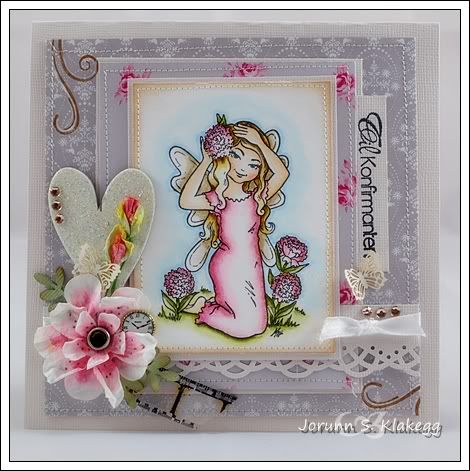
Her er kortet mitt med kaffi filter blomster og roseknopper
Here is my card with coffee filter flower and rose buds. 

Jeg har nylig laget en lignende tutorial for Whiff of Joy, der lagde jeg litt større roseknopper
hvis du har lyst til å se hvordan jeg gjorde det, kan du ta en titt HER.
I recently made a similar tutorial for Whiff of Joy, where I made a bit larger rosebuds
if you would like to see how I did that, you can take a look HERE.


Jeg håper du likte tutorialen min og hjemmelagde kaffi filter blomster. 
Hvis du prøver dette vil vi gjerne se kortet ditt. 
send oss en mail på stampartic@gmail.com
så dukker det kanskje opp i readers gallery! 
Ha en fin dag!

I hope you enjoyed my tutorial, and home made rosebuds. 
If you try making this yourself, we would love to see your card.
please e-mail your card to stampartic@gmail.com
and it just might show up in the readers gallery. 
Have a nice day!